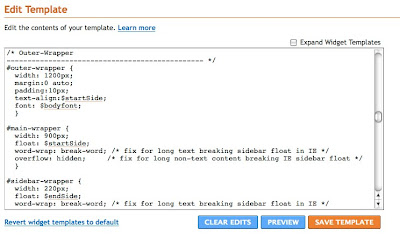
First step is to find out what kind of template you already have to make sure you can host wide enough photos with your template. Log into your Blogger account and click on the "design" button. Next click on the "Edit HTML" button where you will make two simple changes to make your blog wide enough to incorporate the bigger images.
(Before taking another step forward you might consider creating a test blog to mess around with before you make changes to your existing Blog. If you set the test blog to private it will not show up in search engines.)
Next step is to scroll down to where you see "Outer-Wrapper" & "main-wrapper". Change the width on the Outer-Wrapper to 1200 and the main-wrapper to 900.
After you have finished click save and you will not need to mess with this again. Your Blogger layout will now look much wider than before when you check it out.

Next step is to size your images correctly, which I am still working on to see how close I can get to the edge. Your images will need to be 900px or under on the wide side to fit your layout.
Now that your images are cropped and ready you will need to upload them to an outside hosting site like Flickr or Photobucket.
Log in or create an account with one of these hosts and upload your images. Once your image is uploaded click on the image you would to put on your blog and click on the "grab the Link" button. Copy the html code and paste into your new blog post. Hit the preview to make sure everything looks alright.
 If your images are not centered on your layout you can add this tag:
to the beginning of the code and this tag:
to the end of it.

No comments:
Post a Comment